
John Williams' Daihatsu Electric Car · 4 May 08
John is one of the growing number of EV owners in Australia. He runs the website EV Australia (link at end of article) and has been providing useful feedback on this site via comments for some time now. He is putting the wraps on his current EV conversion, based on a two seater Daihatsu Charade (it wasn’t always a two seater: he removed the back seats for batteries).
Other specifications for the EV Conversion:
Controller – ZAPI H2 120V 600A with regenerative braking
Motor – Advance DC 11kw
Charger – Zivian H3
Batteries – 10 × 12V 185AH lead acid total of 550kg (1,200lbs)

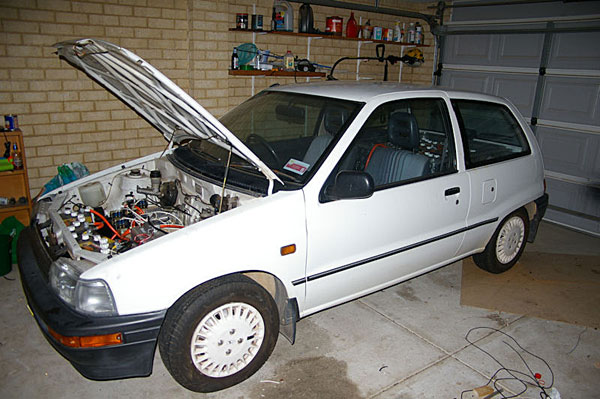
A look under the hood, or “bonnet” as John would say.
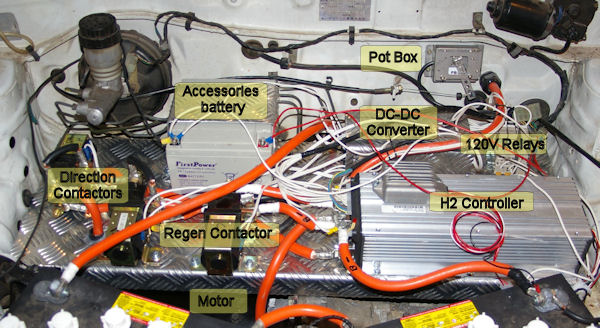
I took the liberty of taking the photo on the left and marking up the components. John will have to jump in and correct me, as I wasn’t quite sure on the DC-DC and really guessed that the far left item was a circuit breaker. John sent along an annotated photo which better shows the parts and includes the ACC battery. What I thought was a circuit breaker is the reversing relay (double throw, double pull?). One of the benefits of having a regen controller like the Zapi is that you get electric reverse as a bonus. BTW, the “wart” on the controller is a mod that steps up the max voltage capability from 96 to 120vdc.
Perhaps at some point we can whip up a rough schematic as well, especially since this EV features regenerative braking, which changes the wiring.
As with any EV conversion there’s often a learning curve or misunderstanding and John’s was no exception: “I didn’t realise that the ZAPI used full pack voltage to drive the contactors and I used ones with 12V coils. To cut a long story short I cooked one contactor and the logic board. I think I’ve narrowed the damage down to a track, 3 diodes and a driver transistor. Hopefully I can repair it otherwise I’m up for a new logic board or controller.”
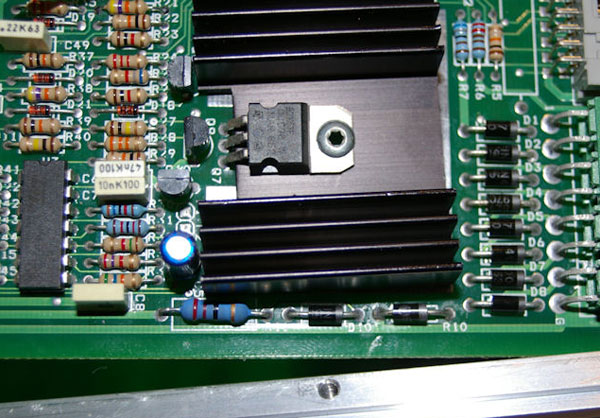
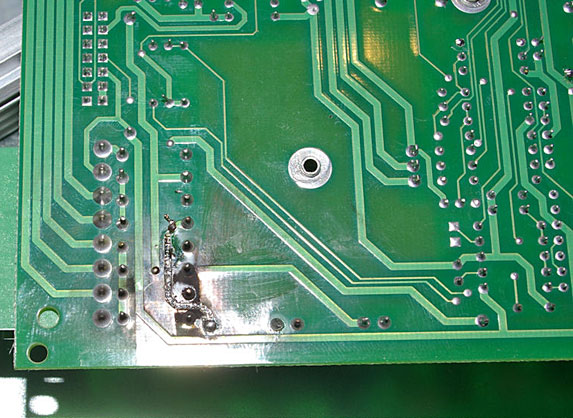
These two photos show the damaged area of the controller’s logic board. John, being an industrious fellow, managed to fix it.
“Replaced 3 diodes, a power mosfet and a bit of jumper wire for the burnt out track totaling $5. It’s now working, a lot better than $999 that a local place quoted me. In fact I got everything together and took the car for a short test drive last night. It works!!!!!!!”
The Zapi H2, since it is a regen controller, is wired directly to the relays so as to control which relay is on and when. That was the case with the Zapi H3 that was used for a bit on my first EV as you can roughly see on the wiring diagram I put together back then.
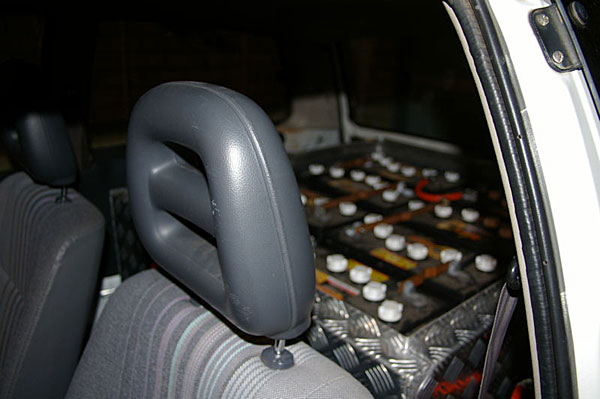
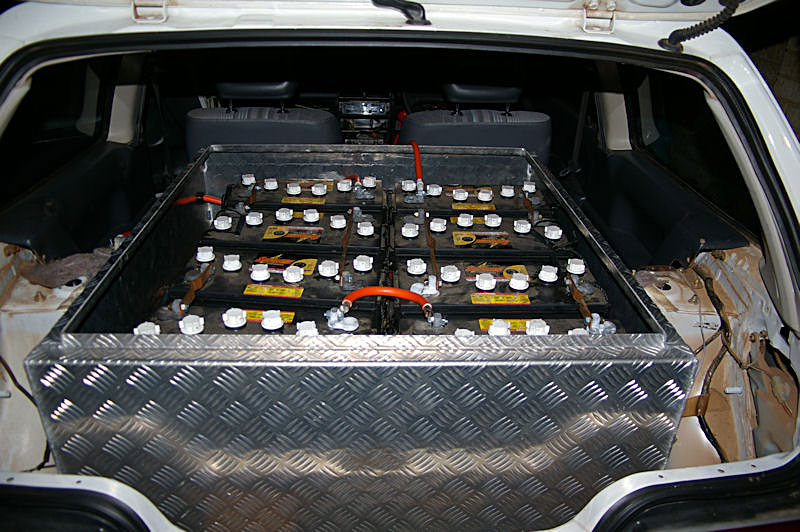
And now for the big challenge: where do you put a thousand pounds of batteries in a small car like this? John got two of them up front with the motor and electronics and the other eight are now “passengers” in the back seat and trunk. I really like the battery box and asked John about it:
“Battery box was made by my neighbor who is a steel fabricator/sheet metal worker. It’s made out of aluminum of cuts and took him about an hour to bend and weld up while I fixed his office network. It will have an aluminum lid once he gets around to making it for me. It’s not hard IF you know how to weld aluminum. Being aluminum I have to coat it with an acid proof paint or give it a rubber lining to get to pass the licensing inspection. Underneath it is a steel frame to give it support which will be bolted to the floor of the car. I’ll take a picture of that when I remove the batteries to bolt everything in. At the moment they are just sitting there and everything tends to want to join me in the front seat when I stop.”
As for lining a few folks in the past have suggested using the thick rubbery stuff they use for truck bed liners. You can buy it in spray cans and in half/full gallon cans to spread on manually. Click the photo to see one of the types I found on Amazon.
The batteries are Supreme (PDF) deep cycle CR 185’s. They cost AU$3000 for 10 plus AU$200 shipping from Sydney to Perth. They are REALLY heavy at 55kg (121lbs) each.
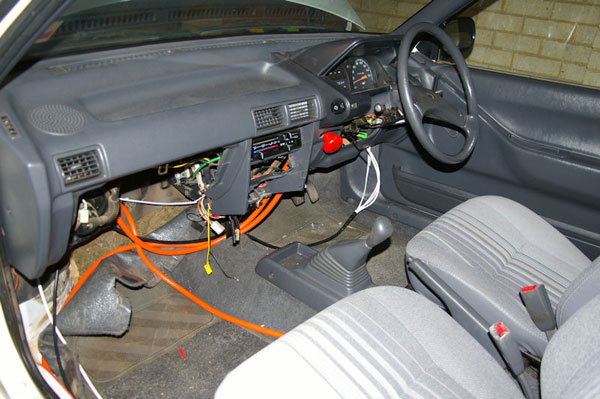
A shot of the interior wiring in-progress. John can jump in with more details on what he’s using for instrumentation.
As mentioned earlier the H2 is a regen controller and John has wired it to eventually use the regenerative braking but hasn’t yet tried it out. One thing that needs to be done first is to change the advancement of the electric motor brushes. Most DC motors come with the brushes “advanced” a bit, which is fine if you only use the motor to generate thrust. Once you start using the motor to generate electricity this advance is the “wrong way” and causes the brushes to arc. ADC motors can be reconfigured and it is suggested that they are put back to zero advance, which strikes a better balance between driving and regen, saving wear and tear on the brushes.
So far John has driven the EV a little bit, but he’s (wisely) holding off on longer test runs until the battery pack is fully secured. Thanks for sharing John. Be sure to stop by and see John at EV Australia.

Thanks for doing up the page Jerry.
I took the car for a longer test drive on the weekend, about 4km. Very happy with the results.
Acceleration from 0 – 40kmh was excellent and way above the original car.
Acceleration from 40 – 60kmh was slower but still reasonable.
Acceleration from 60 – 80kmh was reasonably sluggish but acceptable for a runabout.
The above was done with batteries at about 1/2 charge. I have since wired in the battery charger and will give them a good charge and see how that affects performance.
I haven’t pushed it past 80 yet as I still have to work on the rear suspension and I could really feel every bump or dip in the road.
Currently I have done anything with the instrumentation so don’t have a charge meter or amp hour gauge. I do have 10 separate LED battery indicator circuits which I’m thinking of wiring up until I get a real “fuel gauge”
Nice work going into the car and Jerry I really like the one click zoom in/out on the images.
Hi John.
What great work! I am moving from a 96V Zapi H2 to a Cafe Electric Zilla. I will miss the regen. It’s very satisfying seeing the ammeter go into reverse when you put your foot on the brake. I am sorry to hear about your contactor mistake. That must have been quite expensive!
Your car will be very similar to my blue Rover Metro which was heavy, but did work well. I never got round to the 120V upgrade.
Fortunately the mistake only cost me about $AU200 all up. $105 for a new contactor, $5 for repair of the ZAPI and $90 for 3× 120V relays to drive the existing contactors.
I’m working on an updated wiring diagram that I will post, it’s based on the one you gave me James so will look fairly familiar. BTW, thanks for giving me that it helped a lot, I just should have checked with you on which contactors to use :).
Yeah, I’d have been able to tell you to use HV contactors.
Please make sure your flooded batteries are adequately vented whilst charging. You saw what happened to my car. There’s a picture of the bonnet area on Jerry’s safety page. I wish I’d fitted a household smoke detector too.
The smoke detector is a great idea, I’ll look to see if I can add one to the battery compartment and the cabin. I don’t have a choice with the venting, all EV’s here in Australia have to be inspected and good venting is one of the requirements to get it road legal as are a few other safety features like keeping acid out of the drivers compartment etc.
Haha! I’ve finally found another EV converter who mounted their pot-box upside down too!
:)
Very nice work on the conversion John!
…and you are both from “down under.” Coincidence? I wonder.
‘:^)
Hi Gavin, Actually the way I look at it is that WE have it the right way, everyone else is upside down :)
BTW, If you don’t mind I’m going to add a link to your page from my site and add you to my EV map.
http://www.evaustralia.com.au/EVs/EVsinAustralia/tabid/79/Default.aspx
Took it for another test drive on the weekend. Did 26km with a top speed of 100kmh. It could have done more quite easily but I didn’t want to get done for speeding. I’ve gotten used to the gears now and acceleration is actually very good across the entire speed range if I use 3rd to start and move to 4th at about 50-60kmh. After the trip it took about 4 hours to charge with the charger set up for a 175AH pack (mine is actually 185AH). I think it was charging at a little less than a 10% rate so that would make it about 40% discharged. Not too bad considering I was accelerating hard and running at speeds higher than I would normally. I really do need to get myself a good set of instruments though to work it out properly.
I’ve order a set of custom springs for the back end which should be ready in 2 – 3 weeks, it’s impossible to get anything manufactured any quicker over here because of the mining boom. Once I get them in I’ll be done and ready for inspection.
I’m picking up my heavy duty springs this afternoon. Almost ready to go for the inspection.
John,
I’m a student and I’m converting a 1974 Porsche 914 to an EV. I need to test my controller and don’t know how to. Its a Kodiak C600, do you have any suggestions?
Thanks
Justin
Hi Justin, I don’t know anything about the C600, what voltage is it? Do you want to test is because you think there is a problem or do you just want to check your wiring? I seem to recall that some people have tested the electronics by connecting the controller to a bank of high wattage globes.
What I did though was to wire everything up except for the motor itself and then switch on and look for smoke. I was successful on the very first attempt, ie I got the smoke I was looking for ;) Once I repaired everything I tried again and when it didn’t smoke I very carefully used a multimeter to check the voltage everywhere and then shut everything off and wired in the motor, jacked up the car and gave it some juice. Please though read through my earlier posts above, watch out for that high voltage it can really byte.
Most importantly though, I would advise you to post up your wiring diagram showing the actual components and voltages etc, it would have saved me a lot of headaches if I had done that.
Hi John I am like most people interested in a EV I have a friend that drives a toyota ute converted with a 120 volt system and it runs very well also use it to pull out his electric boat that he use to take cruse around boston bay in Port Lincoln however I intend to build a car my self have some information from the net would like to hear what you have to say regards don Morrison
Hey John, thanks for getting back to me. I’ve just been trying to test it to see if the controller works. Its operating voltage is from 55-144V at a max current of 680amps. I hooked it up to a power supply and a few multimeters and it gets power. I just want to see if it works like its suppose to. I’ve been considering making a test stand for it, the motor, power supply, etc… to make sure it all works before I put it in the car, and to see what new parts I need to buy. I took the electronic components out of an old ev jeep and I’m not sure what works and what doesnt. The good thing is, I recently found all of the wiring diagrams and you’re right… it sure does help!
Hi Don, The first thing to do is make a list of exactly what you want to do with the car. I did a simple one with 2 columns, 1 – The absolute minimum, 2 – The preferred. That way you can balance out the cost versus performance while still guaranteeing that it is useful.
Pay a visit to my site ( http://www.evaustralia.com.au ) if you want some more details on my conversion. I’m more than happy to answer any questions you have.
Hi Justin, Just be really carful that you have the motor tied down. It will want to jump off the table or spin round and tangle up all your cables when you apply power. I put just 12V on to my 120V motor and that wanted to take off across the floor.
Hi,
Does anyone have an electronic copy of the Zapi H3 manual that they wouldn’t mind emailing to me.
http://www.zapiweb.com/contact.htm
E-mail: zapi@zapispa.it
H3 controller
http://www.zapiweb.com/details.php?lang=eng&prod=6&type=Technology&id=1
Is there a UK technical advice office – I have a problem with my braking system