

Schematic Update · 15 December 05

The rest of life, home and work, has been keeping me busy lately which translates into less tangible work on Eve.
Still working on shoe-horning the electric heater assembly into the old A/C box such that all of the air goes through the heater cores and is safely away from the plastic side-walls. Also, before doing much of the installation and wiring of the heaters I needed to update the schematic.
Being more of a visual thinker I tend to do “what-if” designs first, sketching out schematic ideas on paper or a whiteboard. When that finally looks good it’s much easier to implement the real thing.
After a few experiments and false starts here is the updated schematic for the heater circuitry.
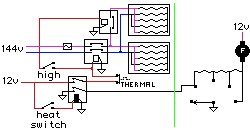
We are using two ceramic heaters this time. Do we turn both on at the same time or provide individual control? Having both is good when you need to blast the defroster, but is probably too much (too much current and heat) when merely trying to take the edge off the cold.
It takes an extra switch and relay to add the additional control, which isn’t that expensive in the grand scheme of things. I’ve wired it such that you can leave the “high” switch on all the time and just turn on/off the main heat switch.
This schematic shows the second ceramic heater with the positive lead going through a separate relay. We use relays because these are high current and voltage lines: 144vdc with up to 15 amps when going full blast. Our 12vdc line is used to control the relays and remains separate from the high voltage.
Also note the addition of a thermal switch. That’s the funky looking thing with “Thermal” next to it. Since a couple of them came with the ceramic heaters it seems a pity not to use them. Not sure yet on the placement, will have to experiment, but the idea is that the switch opens up if the heater mounting area gets too hot.
Since I was updating schematics I’ve gone ahead and added a safety interlock to the main high voltage schematic. Reader, Alvan, was kind enough to send a schematic proposal for the interlock, which I’ve modified a bit and integrated into the design.
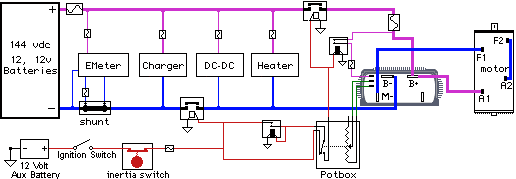
For those who have seen the earlier schematics I should note that I’ve updated the colors as follows:
- RED – 12vdc positive
- BLACK – 12vdc ground
- PURPLE – 144vdc positive
- BLUE – 144vdc ground
Let me try to explain the circuit.
When you turn on the ignition the 12vdc goes through a fuse and one or more safety interlocks like the inertia switch shown here. It could also go through a hood latch detect and a relay energized when the charger is plugged in. The idea is that anything which shouldn’t be “true” when you go to start the car is used to inhibit this control line.
The potbox is hooked to the accelerator pedal and when you press on the “gas” the switch closes. The switch has normally closed (NC) and normally open (NO) contact positions. the NC lead to an interlocking relay setup. If you don’t have the pedal pressed the relay will energize via the bottom 12vdc. If the pedal is pressed, then the relay doesn’t turn on and the high voltage line stays disconnected.
Once the interlock relay energizes it provides its own “holding” voltage. You may also notice that the bottom left high voltage relay (I should number these) turns on with the ignition: meaning the DC-DC converter and heater turn on immediately. The other high voltage relay only turns on when the accelerator is engaged.

Hi Jerry, Very Helpful Dwg. As drawn I think the main contactor coil will always have power regardless of the position of the POT switch. You need to have the interlock relay switch bypass the pot switch to get the latching effect. I’ll send a sketch.
Yes, I did that on purpose. The first main contactor (lower left) will be energized, which means heater & DC-DC are on. The second main contact is energized only when accelerator is pressed. Of course all of them are off if any interlocks open or the ignition is turned off.
Greetings
I’ve been reading your log and find it very interesting/informative. You might find better schematics in a Mitchell manual vs the Chiltons/Haynes etc. The Mitchell manuals are usually available at a local library as you wouldn’t want to pay the price they ask for the electrical book. The Mitchell manual is what most service outfits use and is what I used for my conversion. They have the “exact” diagram with all the correct color codes instead of the “typical” diagrams you see in other manuals. When I converted my Aerostar I didn’t find one difference between the schematic and the actual wiring.
You have a very thorough decsription in your blog for which I compliment you.
My EV is a ‘91 Aerostar van.
Have a cool yule and a frantic first. I’ll be back to see how you are progressing on your project.
73
Orlen
Hi Orlen,
Thanks for the note. I agree on the manuals, as the Ford Shop manual was world’s better than the haynes.
Would love to hear more about your conversion. Do you have any online pics/docs?
-Jerry
Jerry,
I must give you credit. This is one of the best thought out electrical systems for an EV that I have ever seen, and I have been looking into EVs for over 7 years!
Thanks, John!
Hi – have been reading your weblogs with interest. I am in the process of designing my own conversion using all the usual stuff (Curtis, ADC9” etc.) and I am finding your wiring diagrams in particular very helpful. On your page “Schematic Update” there appears to be a line missing between A2 on the motor and A2 on the controller (not labelled)?! Also on the diagram I note that A2 & F2 are linked. How did you do this on your car – I noticed another guy used a copper bus bar but I don’t recall seeing this anywhere before. Anyway keep up the hard work (don’t know if I could be bothered stripping out my loom) and I look forward to reading more.
Actually that’s the line for “Plug Braking”. According to the Curtis Manual (PDF) plug braking is NOT recommended for on-road electric vehicles.
The A2-F2 are shorted using a small cable I made. A bus bar (flattened copper pipe) with heatshrink would be better as it would have a lower profile and presumably even less resistance since there’d be no crimps involved.
where is the inertia switch phisically located in 1987 Aerostar?
Hi Jerry –
Thanks for this excellent page. We have come back here several times while making up our (much simpler) schematic for Project Forkenswift. (Simpler in terms of “optional equipment” – no DC-DC, heater, onboard charger, e-meter…)
I’ll readily admit my newbie-ness at reading electrical schematics (and so I may be wrong), but one thing I can’t find in your diagram is a precharge resistor for the controller. How are you handling this? Using the lightbulb trick?
Darin
PS – Unrelated to EV stuff: just noticed individual comments have no year info in their dates – and they span multiple years.
Yes, I forgot to add it to the schematic. I’ll dig through my electronics box and see if I can find out what value is. The resistor is across the high voltage contacts of the very top relay (purple line).
Good point on the date, I’ve updated the template. Thanks!
Thanks Jerry. They’ve been talking lightbulb precharge resistors on the EVDL the last few days too.
Re the date/comment thing: nice problem to have (multiple years of comments!).
Me again … :)
Why did you use a relay to activate the Key Switch Input connection to the controller (top of the 3 smaller connections), rather than wire it directly to pack +ve after the contactor?
Is that to give you another means of switching off the controller if the pack +ve contactor should weld? If so, I presume there’s no harm in switching the controller’s power on/off frequently?
Thanks – Darin.
While we are on the topic of the KSI relay and precharge resistor – what did you use for these items. I assume the relay is rated for the full DC pack voltage. I have only been able to find an Omron G3NA-D210B but anything DC costs a packet here in New Zealand. I was intending to use the same relay for the heater circuit too.
The precharge resistor should be 750 Ohm/25W (for the 1231C-86XX model) according to the Curtis manual that Jerry kindly linked in post #8 (above) on this page. I am using a wire wound resistor but I have had to up the wattage to 75W as it is not mounted on a heat sink.
Cheers – Nick
Darin,
I don’t recall why it was done that way, maybe based on the Curtis manual? (not with me right now)
Nick,
I’ll try to remember to dig these out next time I’m in the vehicle. They are all packed away right now. I think the ksi was a regular old 12vdc car relay though..
-Jerry
Hi Jerry
Yes – the Curtis wiring diagram shows it exactly the way you have done it.
They turn the controller on and off with the motor contactor but it is kept “warm” by the precharge resistors to prevent current inrush destroying the contacts.
Nick
Hi Jerry,
I am going to fit a bypass contactor soon. Do you think making a busbar from flattened 15mm copper pipe is appropriate? It has to carry up to about 500A but not for long.
Jerry-
did you ever replace the homemade buss bars in your first EV? how did they work out?
I was also wondering if a hammer on welding lug crimper would be suitable for lug crimping in an EV application
The homemade busbars worked out nicely, and with a little ingenuity you can make practically any angle/turn you may need. The best part is you don’t need to do any crimping.
I’ve heard a few people say the hammer crimper worked fine for them, but the majority of folks say that it is too unreliable and too easy to get a bad crimp and not notice. EVAmerica and other parts suppliers will rent a good crimper pretty cheaply, which is what I used for the Mazda. Having seen the results of a few bad crimps ( melt-down) I think that is the best way to go.
Here’s an idea I saw a while back home mede crimper
Jeryy….is it possible to use most of the electric components from a forklift for a conversion? thanks!!
John: I’m using forklift parts almost exclusively for a conversion. The caveat is that everything is rated for 36/48 volts.
I understand some people exceed ratings of certain parts (controllers excepted), but I don’t have the knowledge to say when it’s safe/appropriate to do so. So we’re sticking with a 48v car.
(It also helps that 48v will meet design criteria – short range/low speed).
Check http://forkenswift.com for links to more info.
Darin
If I understand it correctly, the full schematic with precharge should look like this.
http://www.kipanderson.net/media/113.gif
Thanks, Kip, I think that’s pretty much spot on.
Jerry, I have looked at you project over the last year and have learned some from it. Last year I converted an 84 S10 to 144 volt electric. It runs fine with no problems. I have a range of 45 to 60 miles, depending on the terrain and a top speed of 65 MPH. I don’t understand electronics at all. (Sounds crazy.) I do not understand wiring diagrams and positively do not understand relay switches. I have none in my truck. I have a seperate fuse block and switch for the pot box, contactor and controller. It works but am I doing something wrong? I have isolated everything with manual switches, one main breaker on the dash for the battery pack, one switch for all of the original 12 volt items in the truck, and one switch for the above items.
Cliff