

You will find articles organized by categories, along with recent comments, along the right hand column of the website. If you are just getting started with the idea of converting a gas car to electric be sure to check out Your First Electric Car
Welcome and enjoy!
-Jerry
Weighty Matters · 6 November 05
This article is mostly a continuation of the wanton destruction and mindless tearing apart started in the last article. The primary difference being that we are running out of things to remove!
In between removing anything and everything in sight I’ve also been thumbing my way through the shop manual. Interesting reading, if you like that sort of thing. There’s quite a few options that this model doesn’t have: trip computer, turbo, electric assist steering, vehicle maintenance monitor and system scanner, along with various other goodies.
Less stuff to remove…
I keep finding things that I have mis-identified. What I thought was the sub-woofer module turned out to be the Passive Restraint Control Module. Passive, control, restraint: sounds like a mix-up of pent-up aggressions. What it does is keep an eye on the ignition power and turns on/off the shoulder belt retraction motors, among other things.
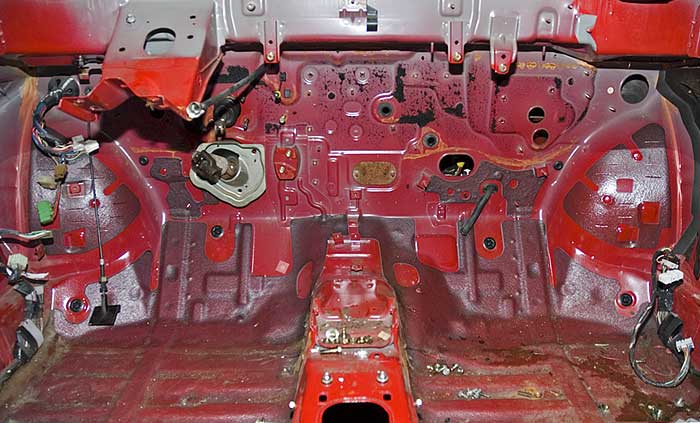
I bet this is what you’ve been dying to see: the dash COMPLETELY gone.
Yessuh, not a bit of dash or dash related item left, just raw steel firewall/body frame and a little bit of that stick on tar stuff that seems to be on the floor of all vehicles. Anyone know what it might be? It’s the dark red material in the picture.
As you can see I even pulled the steering column out.
It was really great fun and I was kind of sad after running out of things to remove.
So let’s go over what got yanked.
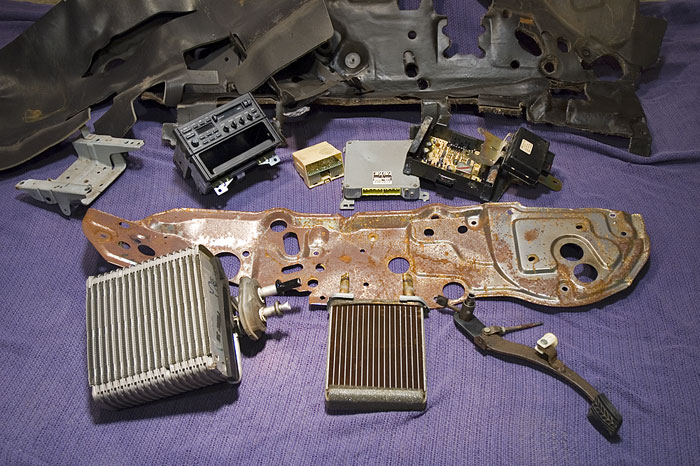
This photo shows some of the major items that were removed and probably won’t be going back in. I’ll go left to right from the top to bottom, row by row:
- two mats, one with thick insulation
- computer bracket, radio, warning chime-cpu, engine cpu, stereo amp, passive restraint control module
- extra firewall shield? It was under the big mat
- a/c cooling core, heater core, clutch pedal
I may end up keeping the warning chime-cpu, only because some of the interior lights go through it. But maybe not.
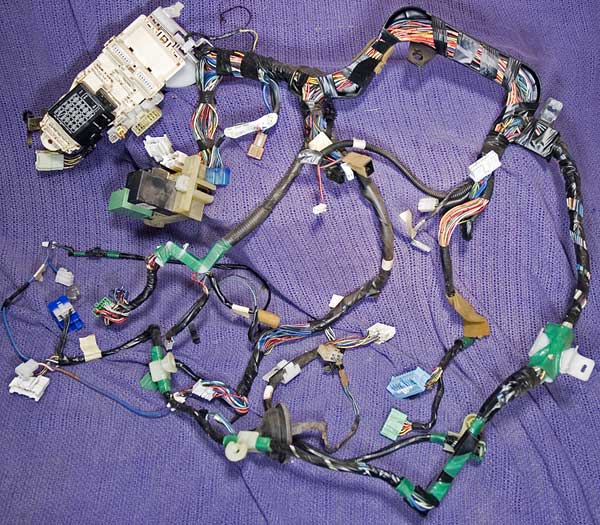
This is the real monster of the bunch, even if it happens to look heart shaped. And, unfortunately, most of it is going right back in when I reassemble the dash. It includes the main fuse block, a small relay block and the daddy of all wiring harnesses. I count at least 30 plugs and jacks on the harness alone!
Believe it or not, most of the connectors are unique, or at least unique to the area of the car that they can reach. One of these days I just gotta tour an auto-manufacturing company to see how all of this comes together.
After removing this stuff I was curious how much they weighed. So I borrowed a mechanical postage meter from the office and here’s the breakdown:
| Item | Weight | Keep |
| ECU | 3.25 | n |
| Dash | 31.00 | y |
| Thin Mat | 3.50 | n |
| Firewall Mat | 11.00 | n |
| AC Core | 5.00 | n |
| Heat Core | 2.30 | n |
| Radio Gear | 8.50 | n |
| Clutch Pedal | 2.00 | n |
| Shift Assembly | 5.50 | ? |
| Belt Motors | 8.00 | n |
| Belt Pulleys | 5.00 | n |
| Center Console | 2.50 | n |
| Glovebox | 4.75 | y |
| Dash Panel | 2.00 | n |
| Carpet | 14.00 | n |
| Total | 108.25 |
Since I’ll be keeping the Dash the total removed weight will be more like 77lbs. I think there must be a hunk of steel in the glovebox, which I’ll be extracting for the little weight savings that provides.
As more items are uncovered I’ll weigh them and add to the list. I don’t expect any really big savings hiding out in the rest of the car, but you never know.
Oh, and guess what else I found? An impact switch!
Back behind the rear wheel well, near the gas filler area, tucked behind a bunch of plastic there was what looked like an oddly placed relay. Turns out that it’s an impact switch to shut off the fuel pump in the event of a collision. Also turns out that one of the wires was completely corroded, so either it was out of commission or the car was about to experience strange fuel cut-off symptoms.
Lucky I came along…
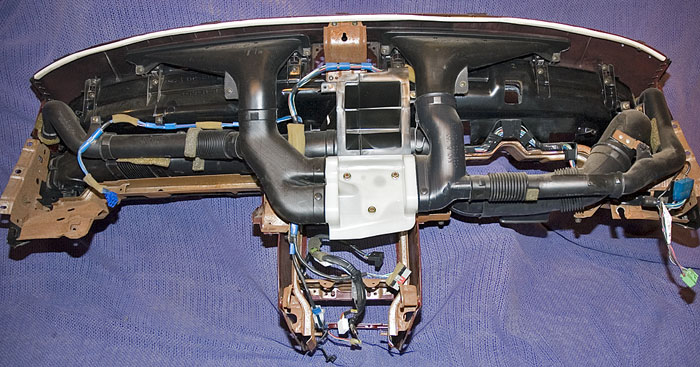
Finally here’s a behind-the-scene view of the dash.
It is quite the get up. There’s a steel inner frame covered by red rubber and foam dash stuff, of course. On the other side, inside, is a plastic liner layer. From what I can tell its sole purpose in life is to have things screwed to it: wires, hoses, pipes, and stuff like that.
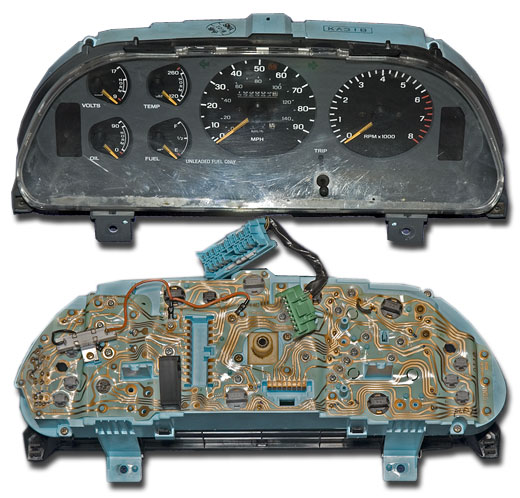
Oh, and I almost forgot. At the top of the page is the instrument cluster. Note the cool flexible circuit board and press-in connectors. I love a car that has lots of meters and this car makes me very happy. Better yet the shop manual provides the resistance values for the meters, which should make it easy to do things like turn the oil into an amp meter, temp into high voltage level, and maybe even make the fuel gauge into an amp hour meter of sorts (that will take a little more effort).

The dark re sticky stuff may be a sound deadening substance.
I’m willing to bet Joe is correct in saying that it’s sound-deadening insulation. Overall, you could probably save about 50 pounds or so by removing it all, but it does serve a purpose – the mass of its tar base serves to dampen vibrations transmitted from the engine (doesn’t matter to you), the road, the car’s moving parts, and the speakers through the car’s body panels, making for a smoother and quieter ride.
This really ought to be a reality TV show… Ok, can you start putting things back together?? I’m dying here man! The suspense!
Joe & Rob: thanks, I was wondering if that was the case. Crazy stuff, and color coordinated!
Matt: put it together? Gee, I’m already starting to get foggy on how it came apart. Wait, I haven’t removed the paint molecules yet…
Jerry: Did you weigh the wiring harness, or is that factored into one of the other weights?
Matt: I was wondering that too…like how does one organize the parts and fasteners? When I redid my mgb engine, I labelled parts using a combination of ziploc bags and little paper tags attached by strings (I called them ‘chicken’ tags and ‘toe’ tags but that’s another story). Sometimes I even took notes, but then I didn’t have a blog in which to record everything. ;)
Dan: yes I did and for the life of me I don’t understand why I didn’t write it down. Have to borrow the scale again.
I labelled some of the wires using masking tape and a sharpie. Mostly just those that I knew needed to be kept but might not be obvious where they came from. Probably not as many as I should have.
Wow is all I gotta say. I just read your previous and then this EV cars pages, and I must say I’m impressed and happy with your write up. While reading your site I had ups and downs of build or not to build an EV out of my http://ecahost.com/280z
(280z). If I build it I would be on an extreamly short budget and not intirely sure I can build it cheaply for under $4000 (excluding batterys).
Howdy Mario,
That’s a nice looking Z…if you were out here I’d see about getting you (and your model) to do the new paint on Eve!
Price depends on what type of vehicle you need and where you get the parts. If you check out some of the other conversions on the site you’ll find the full gamut from high priced lithiums down to Greg’s Yugo built mostly from EBay parts and hard work.