

Them's the Brakes · 9 January 06
Every car uses mechanical brakes. Even an electric car with regenerative braking (using a generator to turn momentum into electricity) has mechanical brakes as a backup. You also need some sort of brake for parking, since an electric motor doesn’t have the back-pressure of its gas counterpart.
Now that Eve’s dash is all pulled apart it’s a great time to get in and check out the brake system, rebuilding or augmenting whatever is needed along the way.
That and I was a little curious what the inside of the brake system looked like…
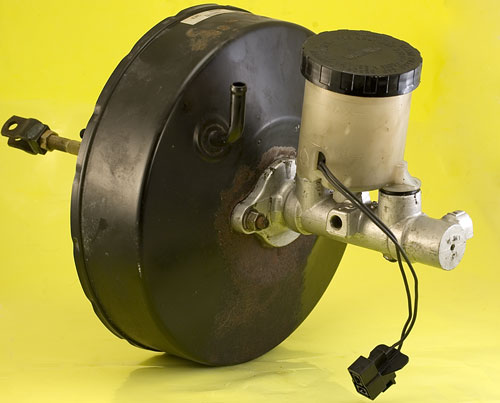
The photo above shows what you might think of as the brake system in a car. A big ol’ black cylinder with a bit of metal and piping sitting under a reservoir of brake fluid. Thin metal pipes snake along the firewall and out to each wheel. (btw, click the little images in the article for a zoomed view…I forgot to add the magnifying glass)
Somewhere behind each wheel you’ll find either a drum or disc brake assembly. Here’s how Eve’s front disc assembly (minus the disc) looks.
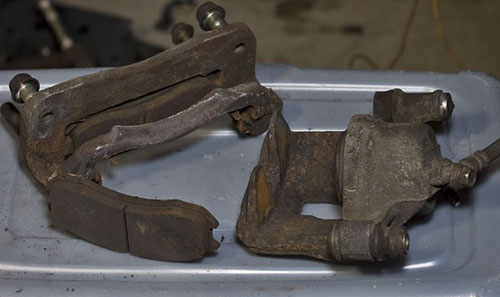
In the front left is one of the brake pads. The assembly in the back holds the two pads on each side of the metal disc attached to the wheel. The gadget on the right is the workhorse of the bunch, it’s the hydraulic cylinder which squeezes the pads together whenever someone steps on the brakes.
These cylinders pretty much follow the main cylinder.
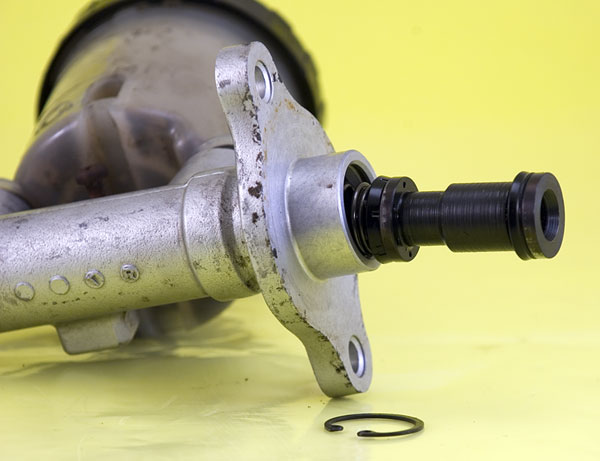
What happens when you step on the brake pedal is that you are pushing a plunger into this hydraulic cylinder. I’ve removed the “C” ring and pulled the plunger part of the way out so you can see it better.
Inside the cylinder is hydraulic fluid, basically it’s stuff that holds up well under lots of temperature fluctuations and doesn’t really compress. The plunger is a lot like a water pump shaft, with a gasket that seals tight along the inner metal walls as it pushes and pressurizes the fluid.
The brake fluid transfers pressure wherever it can, most notably down the skinny pipes and into the disc or drum brake cylinders. The brake cylinder starts to expand, in turn squeezing the brake pads against the spinning wheel disc/drum and slows things down.
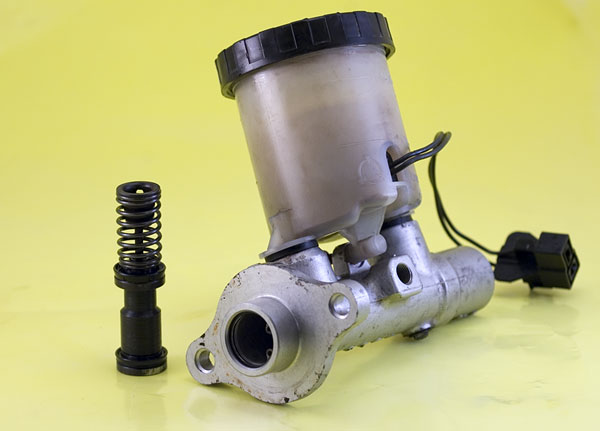
Here’s a closer look at the setup. This is typically referred to as a Master Cylinder. If you were leaking brake fluid or not getting good brake action you might buy a rebuild kit or replace it altogether. Over the weekend I checked both; one place quoted $39 for a replacement, another said $89 for a rebuild kit. Makes no sense to me either.
The wire coming off the side is part of the brake fluid sensor. Inside the plastic chamber is a little float valve which turns on or off depending on how the brake fluid level. Too low and it triggers the dummy light on the dash.
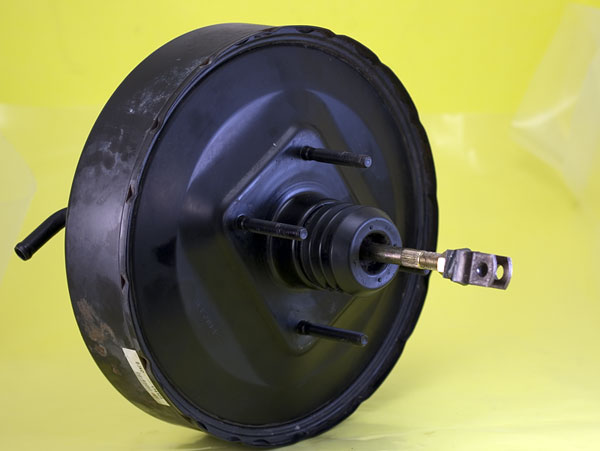
This is the power assist or brake booster. It’s sole job is to make your life easier.
This view of the booster shows the rod that extends into the passenger compartment and actually hooks to the brake pedal. When you step on the brakes you are PUSHING this shaft in.
On older cars and trucks you might not see one of these, just a master cylinder bolted to the firewall. What the brake booster does is take vacuum from the motor and use it to make your foot heavier. Well, not really heavier, but stronger. The chamber builds up a reservoir of vacuum and when you press the brake pedal the vacuum is triggered to assist in pushing the rod into the master cylinder
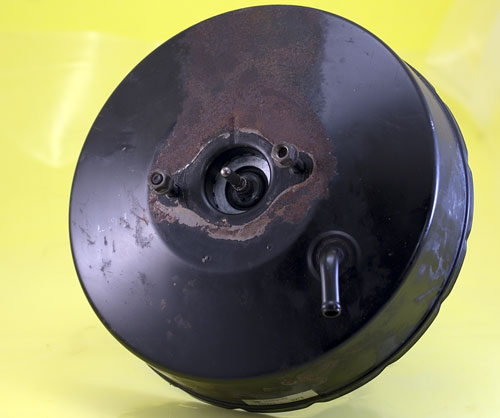
This is the side that pushes into the master cylinder. You can see that there’s been some brake fluid leaking and eating the paint. That’s something to remember whenever you top off the brakes yourself…brake fluid loves to eat paint!
The booster is upside down in the picture.
You can see a metal pipe coming out of the booster. This is the vacuum connection. You’ll find a thick hose going from here to the engine and somewhere along the way should be a check valve. The check valve let’s the engine pull a vacuum and keeps the vacuum from draining out of the booster when the engine is off (or at a reduced vacuum level).
We have an article elsewhere on the site covering Vacuum Assist for electric cars. Since the electric motor doesn’t generate vacuum like its gas counterpart we have to come up with another means of creating the vacuum, or start working out at the gym to toughen up our brake foot and leg.
I was wondering how much force it took to engage the brakes with and without the vacuum assist and decided to do a little test.
Actually, I’ve been watching Mythbusters lately and decided to try doing a little more investigative research. It’s all for the advancement of science, or at least our understanding of it. Rather than just regurgitate things I’ve read I’ll actually try a few of them! ”:^)
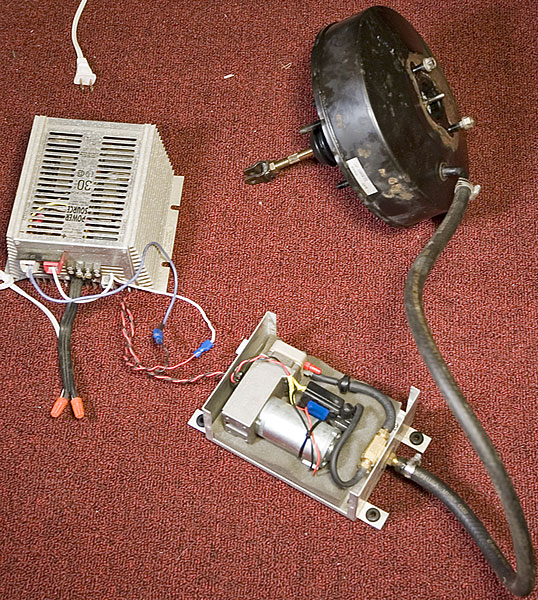
This is the setup. I used the DC-DC converter for a power source. This is from the first EV and was used to turn the 144vdc pack voltage into 12vdc to charge the system battery and help run lights and signals. It’s a heavy duty 30amp Battery Charger/Supply that can run from either AC or DC voltage since it is a switching power supply.
Paul Compton recently posted on the EVList that switching power supplies (usually what your laptop uses) have the following stages:
- input noise filter
- input rectifier (turns any AC into DC)
- input capacitor (smooths DC)
- switching element (turns DC into AC, go figure)
- high frequency transfomer (20Khz up to 2Mhz in some cases) provides isolation (important to keep high voltage system separate from low voltage)
- output rectifier (back to DC again, whee!)
- output inductor (smooth)
- output capacitor (and smoother)
Sorry about the tangent. Anyways, I wired the input up to a wall plug (110vac) and the DC output to the vacuum pump. The vacuum hose is hooked to the booster.
Before starting up the vacuum I set the rod on a bathroom scale and pushed down on the booster: 50-60lbs of force needed to get the rod moving. Started up the vacuum, let it go for a while and measured again: only 10-15lbs of force needed. Cool!
Obviously this doesn’t measure the force needed to push the real master cylinder while hooked to all four brakes, but it’s a good indicator of how much the booster can help out.
Since it’s a small pump and we might be going down a long hill (I know, regen would be nice) we’ll want to have even more vacuum buffering/assistance. Most EV’ers typically add another vacuum tank to the system. I have a chunk of sealed PVC pipe from the first EV.
Oh, the other reason I conducted this test was to see if there were any leaks in the booster. The first EV developed a nasty habit of running the vacuum pump for a long time and I was never quite sure why. Turns out from tonight’s testing that the vacuum shut off switch is a little flaky. It’s an Air Logic Vacuum Switch and I’ll be checking around for a replacement.

I think my vacuum switch is flaky too
Occasionally I don’t get vacuum at all. Recently I was on a downhill sliproad and the vacuum wasn’t being generated. V. hard to stop, it was! I may do one of 2 things.
1. Remove the vacuum assist altogether and have a hard-to-press pedal, but at least I’ll know it and I won’t have to move the diaphragm.
2. Maybe a vacuum box. With it’s gentler pressure release, this might help the switch operate better. It’ll keep the vacuum for longer.
I think it might be worth putting several vacuum switches in place and wire them in parallel. That way, if one of them sticks, the vacuum will still be generated. Lo-tech!
If you’re trying to debug a flaky vacuum switch, an LED light on the momentary-wire from the switch would help you see when it is or isn’t functioning in a pinch. You could run really thin wires from wherever is convenient to the top of your dash, and get a good-enough connection to power an LED.
I very much appreciate you making these pages. I’m a university student bent on learning about the world. I’ve been considering converting an ICE vehicle to an EV as a means simultaneously learning about ICE’s (I’m not very mechanical) and EV’s. But my professor’s a huge solar car devotee (he’s been building them for decades) and he says that converting an ICE to EV is a horrible idea. He says that ICE’s are too heavy, electrifying (right term?) them makes them even heavier, and they end up sucking too much power for too little range to be efficient. You’ve obviously had more practical experience with conversion than either me or my prof., what are your thoughts on the matter?
Hi Karl. It’s the expense of making a purpose built car that stops us! This way is better suited to a home budget. I wish my car were lighter though.
Thanks Jesse. I might do that. There are some unused dash lights like the stall light I might use for ad hoc testing. I know i might need a relay, but it’s shaded and in front of me.
The switch on mine is a set of normally closed contacts that, when sufficient vacuum is sensed, gets opened. I’ve found that it will evacuate the tank and keep running, but if I whack the switch hard enough it shuts the pump off.
So I just need a big, rubber band powered remote whacker!
——
Hi Karl!
A homemade EV isn’t for everyone. Some folks seem vehemently opposed to the very idea and others find great comfort with the hands-on work and being in control.
There’s a wide variety of EVs that you can construct, from motorcycles to lightweight cars, to big ol boats. Some are highly efficient, others are curiosities.
Jerry Halstead,
In your experience does an ICE vehicle end up weighing more after it’s been converted to an EV? I was searching your pages from your first car, but couldn’t find a before and after weight comparison.
Karl,
Depends on the batteries and conversion type, but yeah, most of them are probably a couple hundred pounds heavier.
Greg’s Yugo ended up being much lighter: he only put in the batteries needed for his short commute.
If you have the money (or contacts!) to spring for NiMH or Lithium batteries you ought to be able to build an EV that weighs less and has higher range and performance.
That’s not to say that because an EV is heavier it isn’t efficient. Modern day combustion engines at most reach 25% efficiency, a well constructed diesel a little over 30%. The rest of the energy is lost to the atmosphere as unused heat.
An electric motor is typically 90% efficient or higher, has far fewer moving parts, and is more controllable/reliable.
Maybe what you are thinking of is energy storage? Lead acid batts have a pretty low energy density. NiMH is much better and, of course, the expensive Lithium Polymers are very nice in that regard.
Of course the better the energy density of the battery, the more range, which is a form of efficiency.
Your professor’s solar cars are probably an extreme example of this. A solar panel is able to turn about 13% of the solar energy that directly hits it into electricity. According to this wiki entry it’s about 15 to 60 W/m².
You need a lot of surface area to generate power and typically it’s only enough to move a very lightweight and aerodynamic vehicle (i.e. not crash worthy). Since there are conditions when more power is needed than the panels can provide (heavy loads or lack of sun) they use batteries to augment the system. In this system the battery energy density is very easy to correlate with improved range.
I heard it suggested that one could perferate the diaphram and just use mananual brakes without vacuum assist. Has anyone tried this with a decent sized car (3000 lb-ish), and been reasonably able to stop?
Most mid sized english cars didn’t used to have power brakes until the seventies and eighties, but the ratios of the master cylinder bore to the slave bored in the calipers/drums were more favourable I think and the pedals certainly moved down further. I may get round to trying this with my approx 1.2 tonne car, but i have a feeling I’ll need to change the master cylinder for one with a smaller bore.
Jerry
When I download this latest page I get 1 1/2 blank screens after “how Eve’s front disc assembly (minus the disc) looks.” I have tried it a few times over a few days and it is still the same. It may have something to so with crossing the equator on the way to Australia, but it may be worth a look at your fromatting.
Hi Max,
Thanks for the heads up. Yep, I accidentally made the image a little larger than the column size and IE has this “feature” of pushing everything down until it finds a wide enough slot.
I’ve shrunk the image down and now the page should look good in all browsers.
Jerry,
The Ford SuperDuty pickups with diesel enignes have a self-regulated vacuum pump mounted on the RH inner fender. With a reservoir, it could supply all your vacuum needs in one small package.
Thanks, John. Maybe I should compile a list of vacuum pumps and add it to this or the vacuum article.
James, I don’t remember if you’ve mentioned having an extra reservoir or not. I used a hunk of 2-3” PVC about three foot long, capped on each end with a hose adaptor glued into one end. It provides longer assist on long hills.
No, I need a reservoir witout a doubt. I have noticed the brakes not working well on repeat whether or not the pump kicks in (it sometimes doesn’t). I also think, as I mentioned before, that the vacuum switch would behave better. I was thinking of a bigger, stiffer reservoir the size of a beer can or so. Maybe I’ll get the welder out again.
Thanks for the tip, John, I’ll keep my eye out for production pumps.
So can the diaphram be broken/punctured to give better braking ??
Which diaphram ?
Just removing the check valve does not seem to work …
You can eliminate your power brakes entirely and just go to manual brakes. I would recommend changing the master cylinder to one from a car that had manual brakes to begin with…these usually are smaller diameter cylinders and will produce more force on the brake cylinder although you will have a slightly longer travel on the brake pedal.
I did a conversion on a street rod where I used the master from a full size Chevy/Ford pickup truck with No booster and disk front brake conversion. Found out that venting the disks added approx 25% better braking ability.
Brake venting is drilling holes in the face and back surfaces of rotors and drilling through the outer surface of drums using a 1/4 inch bit and drilling three to five holes in a diagonal line (one edge of surface to the other) and doing this four times. As a clock face would show at 12, 3, 6, and 9 positions. Note after drilling is complete PLEASE, PLEASE turn disks or drums (any brake repair shop can do this) to avoid gouging out your shoes/pads from drillingskore marks. Venting brakes reduces the ammount of trapped gasses that are caused by heat build up and brake pad/shoe erosion. It allows these build up gasses to easilly escape the braking surface areas. This allows the pads/shoes to get better contact with the rotors/drums lessening the force needed to stop the vehicle.
where can I find a 12vdc vacuum pump?
Thank you for sharing your experiences.
I am currently in the planning phase of an EV, but probably will be in the form a small motorcycle. Hopefully this will help with the learning curve.
I also have still to grasp how to overcome some climate challenges inherent with the Phoenix, AZ area. Batteries are literally cooked after 2 years of use in a ICE vehicle, so I have no illusions of the difficulties to maintain a somewhat acceptable life expectancy (today’s high: 111F) for the batteries as used in this sort of application.
Of course a small pvc can keep the 12V system charged over here.
Anyway, in regards to Karl’s (and follow up -) comments: the additional benefit of converting ICE vehicles is the recycle value. I’ll see if I can find the Wiki again, but I believe that 80% of a cars emissions, measured over a 4 year period, are generated by virtue of its use, i.e.: exhaust/CO2. The remainder being generated by the various aspects of the fabrication,assembly and disposal processes.
One again, thank you for all the insight.
yves.
Hey guys,
I have been pondering over the safety involved with only a parking brake to hold your electric cars from rolling away. Even when the car is in gear you can push it since there’s no longer back compression from an internal combustion engine and parking on hills increase the likelihood of a mishap, not to mention that we all can be forgetful at times and setting a handbrake is an acquired habit.It accrued to me that the use of a hydraulic line lock could be a solution.
Something such as the Jamar Push Button Line Lock or the Electric Brake Line Lock Kit found at http://www.lowrangeoffroad.com/sambrakes.htm.
Now I don’t particularly like the idea of power being drawn when the car is not in use and figure there must be a way around this such as turning the key on actually deactivates the system releasing the held fluid.
So I thought I’d through it out here to you all and see if it has any interest.
Do we have any manual tranmission specialists? I was wondering how hard it would be to jam the tranny into 2 gears at the same time – which would lock it. Toyota trannies have overdrive bolted on to the outside of the case, and so it should be easy to get to that fork and put some other lever on it.