

You will find articles organized by categories, along with recent comments, along the right hand column of the website. If you are just getting started with the idea of converting a gas car to electric be sure to check out Your First Electric Car
Welcome and enjoy!
-Jerry
Connections · 15 November 05
A bit of a diversion to try and cover something near and dear to our hearts: plastic panel and wire connectors.
If you take a look around the interior of your car you probably won’t see any screws. It’s part of the magic. Who wants a car that looks screwed together? We want contiguous, smooth entities of car-ness that speak to us in luxurious undertones.
Which reminds me of Ricardo Montalbán’s rich corinthian leather Chrysler Cordoba commercial.
Anyone who’s tried to install a car stereo or do passenger compartment work has probably run into some of the connectors. They just aren’t very obvious, nor is the means to remove them. For me it’s usually a learn-by-breaking process, where the first connector gets prodded, pried, poked, and eventually snaps. But after that sacrificial connector I can usually figure out a good technique for the others.
The main problem is that there are so many different types…
BTW, I haven’t a clue as to the real names of ANY of these connectors, although I found a couple online which might be close (see links at end). If you are a world renowned connector czar please feel free to correct my totally-made-up names.
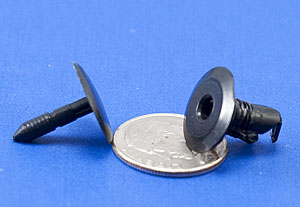
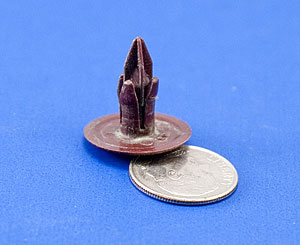
Black Push Pen of Doom
It doesn’t even look like a connector, but if you slide your thumbnail under the plastic edge and pry, the center will pop out, and then the main “anchor” will be easy to pry out.
This is a common design. Much like drywall anchors the goal is to have something become bigger than the hole, rather than rely on friction.

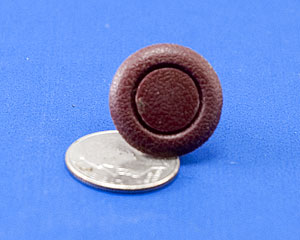
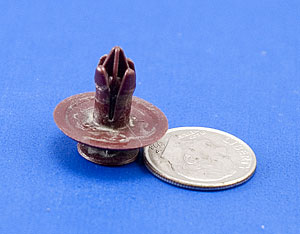
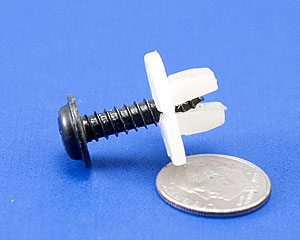
BPPoD w/Screw Head
Yeah, just when you figure out one of the connectors the next one is slightly different. Same concept: center expands the base and anchors it in place. Except this one can be UNSCREWED!
My theory is there were two warring engineer factions, right-brainers and left-brainers. One camp was yelling “never mar the beauty of the fastener!” while the other guys were mumbling “it’s going in upside down under the dash you idiots!”
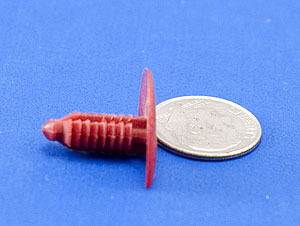
Red Plastic Expando Thing – Front
This is another adaptation of the BPPoD but with the removable pin recessed in the base rather than covering it.
Very tricky.
This is why we evolved fingernails.
RPET – Back
Here’s an action shot. I can hear you folks out there screaming for more action and this is it. The back side of the RPET with the pin partially in place.
Tension is mounting, what will happen?
RPET – The End
And there you have it, the back view of a fully engaged RPET as viewed from inside the compartment.
With this kind of hard-hitting, fact filled, action packed learning is it a wonder that the Science channel keeps filling up my answering machine with requests to host my own show?
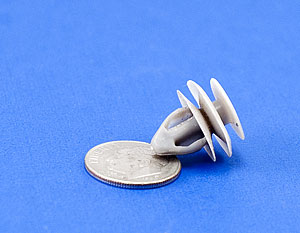
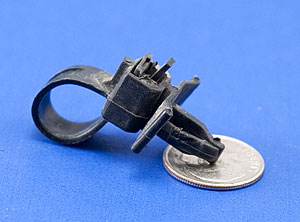
Ribbed Connector of Doom!
Yeah, another connector of doom, but anyone who has faced off with one of these will agree that it’s a total pain in the butt.
This one is broken…most of them are. I mean, look at that thing. There are deep sea fish hooks that have less bite than this!
Total craziness.
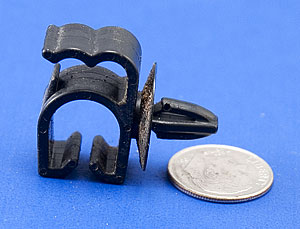
Rip the Door Panel Up Connector
Actually this one isn’t too bad. The right side, rounded head, slides into a slot of the particle board that makes up a car’s door panel. There are a dozen of these scattered around the outer edges of the panel and the best tool for removing them looks a lot like a dandelion tool. In fact that’s what I used to pull this one off.
Evil car makers use Ribbed Connectors of Doom for door panels.
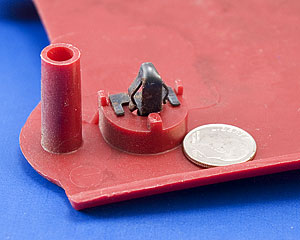
Garnish Clip?
I spent endless hours researching and near as I can fathom this is either a panel clip or a garnish clip…or both. Garnish clip? As in, “Let’s garnish the interior of the car with a heaping helping of plastic”?
No clues when you run across these, the other side of the panel has no markings. Just pull and hope.

Double your Garnish, Double your Fun Clip
Yet another way to make plastic stick where it shouldn’t…
This is from a panel on the side of the dash, which is probably why those little felt pads are there. They help to keep the squeaking and rattling down.
A Screw FCOL1
These aren’t really used to keep the plastic panels in place, but you’ll find variations of them all over the car doing everything else.
Little square holes are punched into the body metal and the white plastic clips are popped in. Screws make the clip expand and keep them from pulling out. The plastic keeps the screw from loosening. Simple and effective.
1 for crying out loud
Ny-Tie Anchor
A radio engineer I worked for called them “ny-ties.” In my world travels I’ve found that folks call them everything BUT ny-ties. I used to take umbrage at their obvious lack of culture.
I’m better now.
Tywrap, ny-tie, single-use handcuffs. Call them what you want. The right side snaps into a sheet metal hole and viola, instant wire bundle holder!
Crazy Go Wild Clip
Another pop-into-a-hole clip variation.
This one looks like it was designed by a committee.
Clip wires into the openings, the wires are slightly bigger than the openings and, like wasps in a bottle, can’t figure out how to leave.

Harness Thingy
This doesn’t really belong here, but I got a couple bucks kick-back from the harness wiring industry to feature it so what the heck.
A wire bundle is placed against the flat “L” shaped area and taped in place. On the firewall are bolts, welded to the metal. The back of this connector pushes onto a bolt and has enough “stiction” to stay.

Detroit Finger-cuffs
These would sure come in handy the next time you have to baby-sit! Click, click and you have a captive audience.
In the car I think they are used for something like holding two bundles of wire together and clipped to the chassis.
What fun is that?
In case you are curious I took all of these photos in my little homemade photo lighting box. I’ve written a couple semi-related photography how-to’s on another of my websites, The How Zone.
Finally, for your link clicking pleasure here’s a number of connector manufacturers that I ran across:
- cable clamps and mounts
- threaded metal fasteners
- garnish clip
- clips, clamps, straps, brackets, hooks
- nyltite
- Elgin has some handy info pages, including: screw point types, metric conversions, types of bolts and screw heads including the dreaded one-way head.

Hey Jerry,
I just read this article on panel connectors, ROFL. I used to work in an automotive dealership (VW) and even the manufacturer can’t keep the same name twice in two different cars. But everybody says the same thing those (expletive deleted) panel thingies that hold the door panel on?!? LOL
Have fun putting the car back together!
Peter
Hi Peter,
Good to hear it’s not just some localized confusion in my brain/car.
We should run a contest to discover the strangest or most convoluted connector!
Owning 4 Probes in the past, and one currently, yea. I’ve broken like 50% of these things in my car. Strangly, the interior is still pretty well attached!
I work in auto glass, so I am familiar with all those clips and holders and screws. They all hold together half the car these days.
We generally refer to them as 1. expansion clips (for any that have any sort of post/plastic screw/plunger in the center), 2. Christmas Tree clips or old school door panel clips (for those with the broad head and the plastic ridges all the way down), and 3. Spring clips (for any clip consisting of metal bent in such a way that it will compress to slide through an opening, then spread open again once on the other side).
The best way to take any of these off depends on the individual clip, and the names change from car to car according the the manufacturers. AG guys find three tools to be indispensable in taking apart interior trim: a tack puller (looks like a tiny dandelion puller, comes from sears, lowes, wherever), a small pick, preferably flatheaded (great for separating those two-part expansion clips), and a door panel or upholstery tool (from autozone, equalizer, auto upholstery shop).